It's been a VERY busy few months! The biggest news is that my younger brother got ENGAGED and it's been a whirlwind of parties since late May. That brings me to some fun, new crafting adventures. :)
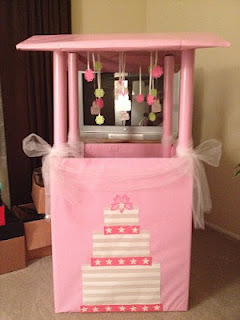
I helped plan my future SIL's Bridal Shower and had a little too much fun, I'd say. Here was one of my big projects for the day. Many more cute ideas to follow in upcoming posts.
Bridal Shower Wishing Well
I made one of these for my sister's shower several years ago and it was so cute I had to do it again! This time I ran with our shower theme which was wedding cakes. The invitations had little wedding cakes on them as well as everything else from favors, plates, napkins, game pieces and more
This looks a bit intimidating but I promise it really is not that hard or expensive to make. Packing tape is your friend! (similar to my mantra with glue guns) All you have to do is basically wrap it like a present. Check out the following pictures and instructions.
Step One
Supplies: one large box, one flattened box (for the roof), four rolls of wrapping paper, scissors, packing tape and items for decoration. I used leftover wrapping paper (white stripe), ribbons and card stock cut with scrapbook punches to decorate the wishing well.
Step Two
Start by securing the large box with packing tape around the edges. It will eventually be filled with pantry and cleaning items so you want it to be sturdy.
Step Three
With the top of the box open (you can fold the flaps inside for added support or tape them up to make the box appear larger), wrap the box as you would a birthday gift securing with packing tape. Don't go over board with the packing tape on the outside of the box as it will be easily visible and look messy when you are done. I folded over the edges of the wrapping paper and rolled the tape to secure it from underneath.
Step Four
Wrap the empty rolls of wrapping paper and secure to the inside corners of the box with massive amounts of packing tape. These will serve as the roof support. Ok, not massive amount of tape... maybe two or three 6-inch strips will do. Feel free to use as much as needed because no one will be looking at the inside.
Step Five
Loosely wrap the flattened box with wrapping paper. The box I used had two natural bends from being shipped. I accentuated them by bending back and forth. It helped to form a natural pitch to the roof. I did not attach the roof to the four poles for easy transport. It stayed well enough even throughout the shower.
Step Six
The decorating. Determine what materials you would like to use and what you want to try to make. I went with the wedding cake theme which made decorating easy because I really just needed to cut three rectangles and layer them on top of each other. I secured the rectangles with rolled packing tape on the back corners of the white paper. I also added tulle to the top of the box by tying it to each of the four poles and making a bow.
Step Seven
Since I am an avid scrapbooker, I have a few paper punches and used those to make the hearts for the cake topper. I used thick ribbon and folded it under at the edges to border the bottom of each cake layer. Use a hot glue gun for this as the ribbon may not stick with just packing tape.
Step Eight
 I made paper cakes to hang from the roof of the wishing well. (another post to follow with instructions for that) I hot glued thin ribbon between two like shapes (flowers and cake) then taped to the under side of the roof. It adds such a cute touch to the finished product!
And there you have it! A homemade wishing well that will wow the Bride-to-be!! (and help her stock their pantry!)


I am excited to do this for my best friends shower, I've been searching or ideas on making my own wishing well this sounds easy enough! Thanks for the instructions;)
ReplyDeleteI'm so glad you are excited! This was fun to make and it was a hit at the shower. Please let me know how it turns out! :)
Delete